K8S实战
01、K8s实战:Windows10安装Docker,配置阿里云加速器
02、K8s实战:基础知识之简介
03、K8s实战:基础知识之组件
04、K8s实战:Centos7.6yum安装Docker,配置阿里云加速器
05、K8s实战:Centos7.6安装dockercompose
06、K8s实战:Centos7.6使用Ansible安装K8S(测试单节点)
07、K8s实战:Dockercompose安装中文版GitLab,配置SSH免密登录
08、K8s实战:Centos7.6安装私服Harbor
09、K8s实战:SpringBoot使用jib打包Docker镜像至私服
10、K8s实战:dockercompose之网络设置
11、K8s实战:使用开源项目io.fabric8之docker
12、K8s实战:二进制方式搭建K8S集群(环境准备)
13、K8s实战:二进制方式搭建K8S集群(完结)
14、K8s实战:K8S管理平台Rancher安装及集群导入
15、K8s实战:陈述式管理之kubectl常用命令
16、K8s实战:声明式管理示例之K8S部署Nginx及修改删除
17、K8s实战:K8S存储Volume之ConfigMap
18、K8s实战:K8S存储Volume之Secret
19、K8s实战:K8S存储之emptyDir+hostPath
20、K8s实战:K8S存储之NFSPVPVC
21、K8s实战:K8S控制器之ReplicaSet
22、K8s实战:K8S控制器之Deployment
23、K8s实战:K8S控制器之DaemonSet
24、K8s实战:K8S控制器之JobCronJob
25、K8s实战:K8S之Service
26、K8s实战:K8S之Ingress
27、K8s实战:K8S之Schedule
28、K8s实战:K8S之Helm安装与配置
29、K8s实战:K8S之部署微服务项目实战
本文档使用 MrDoc 发布
-
+
首页
12、K8s实战:二进制方式搭建K8S集群(环境准备)
### **环境准备** 1、 根据电脑配置初始化虚拟机,集群的话,master至少两台,分配内存2G,CPU2核,硬盘30G,安装完成后确保能ping通外网IP地址; 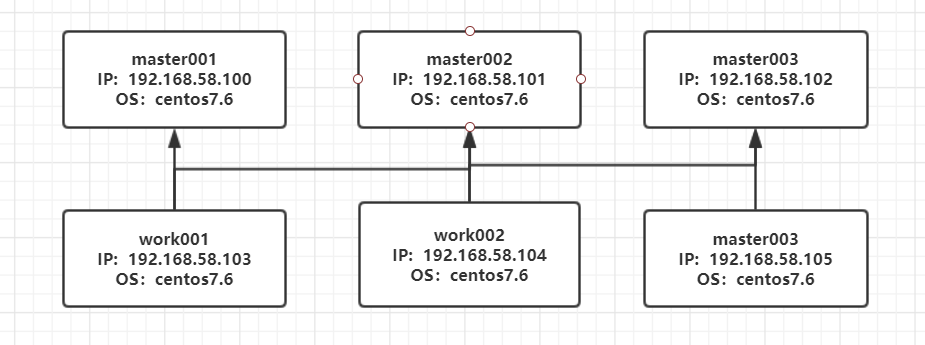 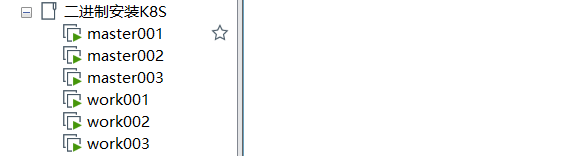 2、 修改主机名,实际按照公司规则修改; ```python # 关闭防火墙,全部执行 systemctl stop firewalld && systemctl disable firewalld # 各虚拟机设置主机名,挨个执行 hostnamectl set-hostname master001 hostnamectl set-hostname master002 hostnamectl set-hostname master003 hostnamectl set-hostname work001 hostnamectl set-hostname work002 hostnamectl set-hostname work003 # 查看主机名 hostnamectl status # 修改Hosts vim /etc/hosts # 添加如下内容 192.168.58.100 master001 192.168.58.101 master002 192.168.58.102 master003 192.168.58.103 work001 192.168.58.104 work002 192.168.58.105 work003 # 复制hosts至其他虚拟机 scp /etc/hosts root@master002:/etc/hosts scp /etc/hosts root@master003:/etc/hosts scp /etc/hosts root@work001:/etc/hosts scp /etc/hosts root@work002:/etc/hosts scp /etc/hosts root@work003:/etc/hosts ``` 3、使用chrony实现时间同步(每台都执行); ```python # Centos7.6已默认安装,查看状态 systemctl status chronyd # 替换server开头为中国NTP公共时间同步服务器 vim /etc/chrony.conf 添加内容 server ntp.aliyun.com iburst server cn.pool.ntp.org iburst server time1.cloud.tencent.com iburst # 重启chronyd systemctl restart chronyd # 查看时间同步源,查看时间同步进度 chronyc sources –v ``` 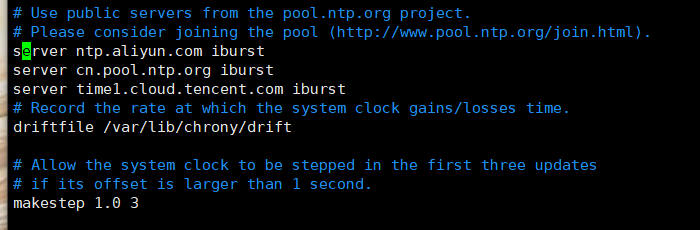 4、升级内核(每台都执行); ```python # 查看内核,3.10.0可不升级,k8s,docker,cilium等很多功能、特性需要较新的linux内核支持,所以最好升级 cat /proc/version # 载入公钥 rpm --import https://www.elrepo.org/RPM-GPG-KEY-elrepo.org # 安装ELRepo rpm -Uvh http://www.elrepo.org/elrepo-release-7.0-3.el7.elrepo.noarch.rpm # 载入elrepo-kernel元数据 yum --disablerepo=\* --enablerepo=elrepo-kernel repolist # 查看可用的rpm包 yum --disablerepo=\* --enablerepo=elrepo-kernel list kernel* # 安装长期支持版本的kernel yum --disablerepo=\* --enablerepo=elrepo-kernel install -y kernel-lt.x86_64 # 删除旧版本工具包 yum remove kernel-tools-libs.x86_64 kernel-tools.x86_64 -y # 安装新版本工具包 yum --disablerepo=\* --enablerepo=elrepo-kernel install -y kernel-lt-tools.x86_64 #查看默认启动顺序 awk -F\' '$1=="menuentry " { print $2}' /etc/grub2.cfg #默认启动的顺序是从0开始,新内核是从头插入(目前位置在0,而4.4.4的是在1),所以需要选择0。 grub2-set-default 0 #重启并检查 reboot # 查看升级后内核 cat /proc/version ```  安装依赖工具(每台都执行); ```python # 文档中脚本默认均以root用户执行 yum update # 安装python yum install python -y yum -y install epel-release # 安装pip yum install git python-pip -y # pip安装ansible(国内如果安装太慢可以直接用pip阿里云加速) pip install pip --upgrade -i https://mirrors.aliyun.com/pypi/simple/ pip install ansible==2.6.18 netaddr==0.7.19 -i https://mirrors.aliyun.com/pypi/simple/ ``` master001配置免密码登录; ```python # 更安全 Ed25519 算法 ssh-keygen -t ed25519 -N '' -f ~/.ssh/id_ed25519 # 所有节点地址包括自身,按照提示输入yes 和root密码 ssh-copy-id 192.168.58.100 ssh-copy-id 192.168.58.101 ssh-copy-id 192.168.58.102 ssh-copy-id 192.168.58.103 ssh-copy-id 192.168.58.104 ssh-copy-id 192.168.58.105 ``` master001下载安装工具及安装包; ```python # 下载工具脚本easzup,举例使用kubeasz版本2.0.2 export release=2.2.1 curl -C- -fLO --retry 3 https://github.com/easzlab/kubeasz/releases/download/${release}/easzup chmod +x ./easzup # 使用工具脚本下载 ./easzup -D ``` 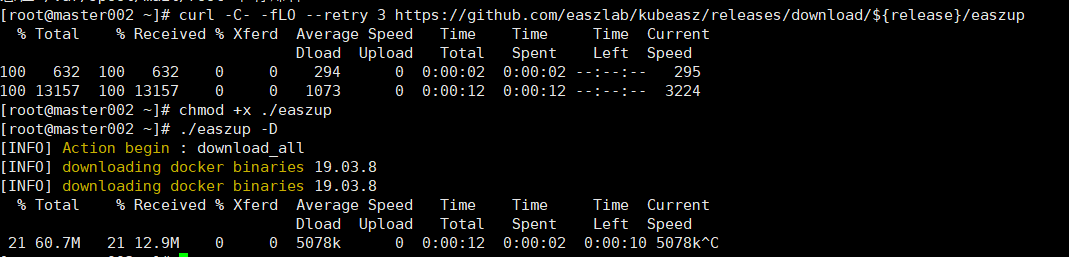 安装完成后可查看下载文件: 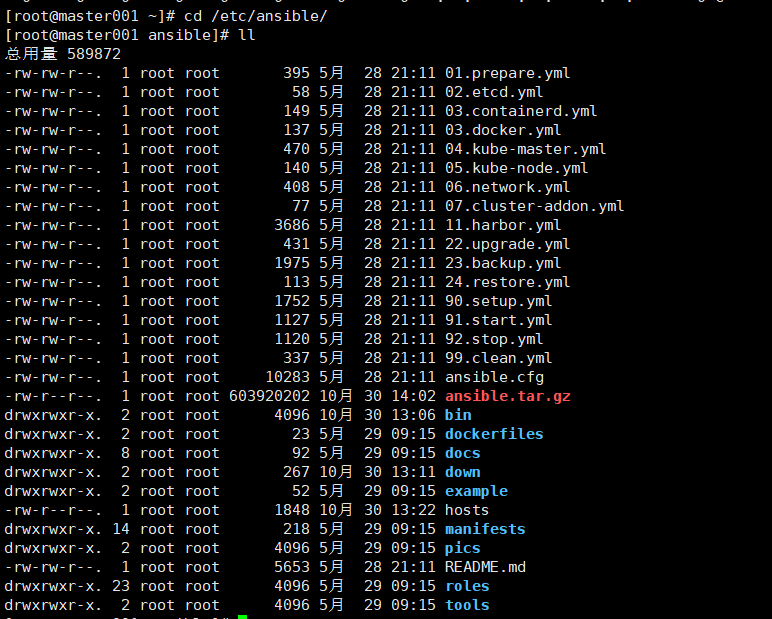
李智
2025年3月17日 13:28
转发文档
收藏文档
上一篇
下一篇
手机扫码
复制链接
手机扫一扫转发分享
复制链接
Markdown文件
分享
链接
类型
密码
更新密码